Home Assistant
Integrations
Life360
First, none of this would be possible without the generous work and support by Phil Brukner
Thank you, Phil.
The most difficult part of the new installation method was discovering my access_token and token_type.
I am HTML-challenged, so after some assistance from Phil, here is how I found the access_token and token_type.
This is done on the Chrome browser. I couldn't figure it out using Edge.
1. Open Chrome
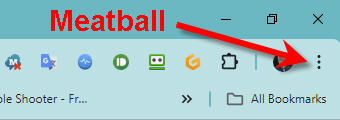
2. Click on the meatball menu to enable the Developer Tools option.
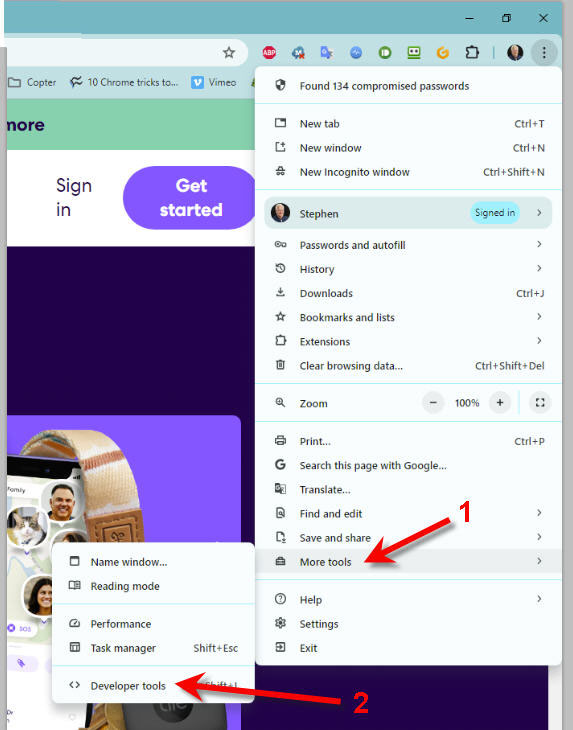
3. Go to https://life360.com/login.
4. Open the browser's Developer Tools sidebar then go to the Network tab.
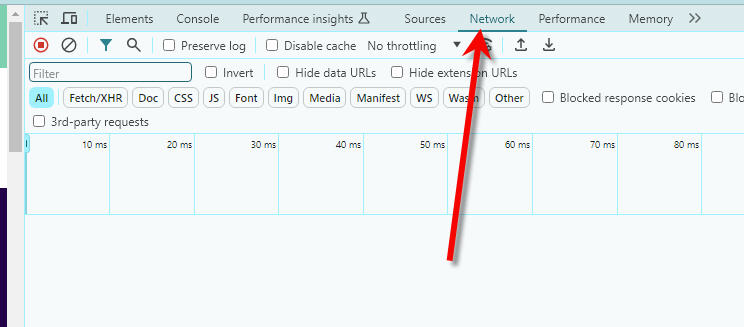
5. Make sure recording is enabled. (CTRL-R)
6. Log into your Life360 account.
7. When the login process has been completed, look for the "token" packet.
Hint- enter "token" into the filter field.
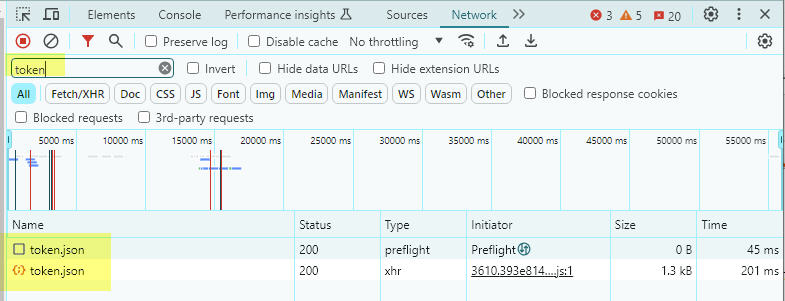
8. Click on token.json to reveal the access_token and token_type.
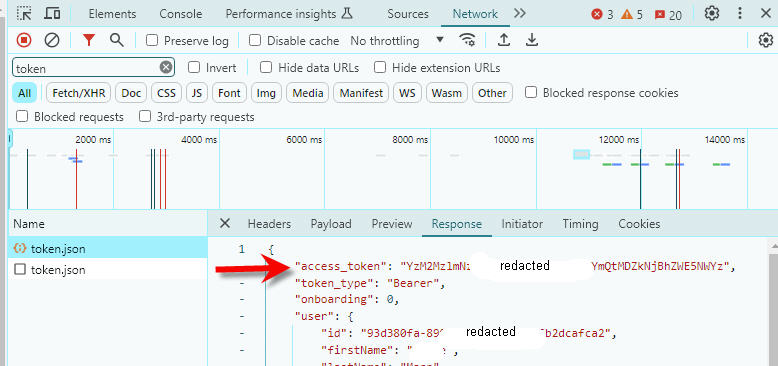
- Copy those values into the corresponding boxes (access_token and access_type) on the HA account page. (Note that the token_type is almost certainly "Bearer".) You can put whatever you want in the "Account identifier" box.
(If this doesn't reveal your token and type, look for another "token" packet which uses the POST or BEARER method, and has data.)
openHASP
- What follows are my notes from experimenting with OpenHASP on a 480x480 screen.
OpenHasp is a customizable touchscreen UI, connected via MQTT.
Links
Openhasp Web Page
Home Assistant community
HASPOne and OpenHasp Discord Page
Guition ESP32-S3-4848S040
- ESP32-S3 - 4848S040 - 480*480 IPS touchscreen
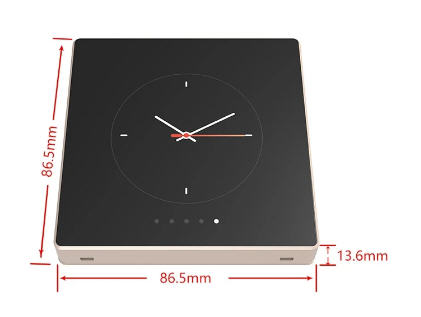
ESP32-S3 4.0 Inch Development Board (AliExpress)
Planning and setup - ESP32-S3 - 4848S040 - 480*480 IPS touchscreen. (Forum link)
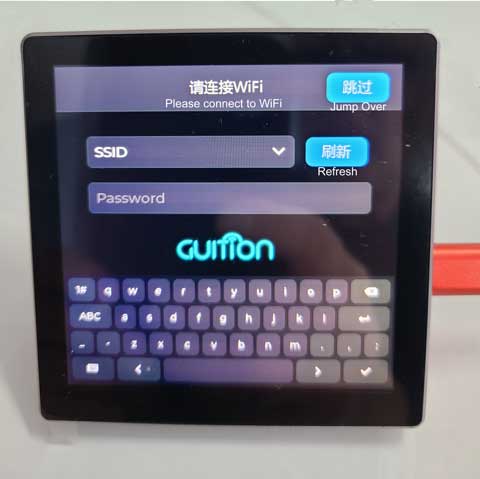
First Power-on, factory configuration
To connect to WiFi,
- Press the "Refresh" button to scan available APs
- Press the down-arrow to select the AP
- Enter the password
- Press the check-mark on the keyboard area.
Install Firmware
- Connect the display with your computer
- Flash the Firmware: Use Chrome Browser while you on the Nightly Build Site. Select “Guition ESP32-S3-4848S040” and Install.
- Setting Up Wifi: Follow Instructions on the screen
- Install HomeAssistant Components
- Install The OpenHASP Component from within HACS
Make sure your Display is running and reachable (Default setup shows with text “plate” on the top left corner of the screen and a popup with the actual IP-Address).
- MQTT Credentials: Got to the device IP-Address with your browser: http://your_ip/config/mqtt and fill in your MQTT credentials.
- Delete any pre-defined pages: Got to the device IP-Address your with browser: http://your_ip/edit and delete the pages.jsonl file
- Configure the GPIO: Go to the device IP-Address with your browser: http://your_ip/config/gpio and add:
- GPIO Output
- PIN: 40
- TYPE: Power Relay
- Groupe: None
- Value: Normal
- Set Up your display within Homeassistant. Detailed information here.
- Define the plates (pages) in configuration.yaml
plate:
  objects:
    - obj: "p0b1"
      properties:
        "text": '{{ states("sensor.attic_sensors_temperature") }}°F'
    - obj: "p1b2"  # light-switch toggle button
      properties:
        "val": '{{ 1 if states("switch.officelight") == "on" else 0 }}'
        "text": '{{ "\uE6E8" if is_state("switch.officelight", "on") else "\uE335" | e }}'
      event:
        "up":
          - service: homeassistant.toggle
            entity_id: "switch.officelight"
We’ll edit the files later on.
- If everything works as expected the display will be auto-discovered by OpenHASP-Component
- Add an empty Automation and notice the entity_id of it (((why?)))
- Add a HA-Template sensor in configuration.yaml and edit to your needs (May use http://gridcalculator.dk/ 27 to calculate col and gutter values).
template:
  - binary_sensor:
    - name: Display settings
      unique_id: 1b3a3dae-fd0c-4f47-9c8b-5b680478a977 # https://www.uuidgenerator.net/
      state: "{{ now() - state_attr(this.attributes.update_automation | default('automation.update_display_data'), 'last_triggered') > timedelta(seconds=this.attributes.update_time | default(120) |int ) }}" # change the default automation entity_id from step 3 before
      delay_on:
        seconds: 2
      attributes:
        update_automation: "automation.update_display_data" # add a the automation entity_id from step 3 before
        update_time: "80" # sending the config via mqtt needs some time to complete. This stops the automation from re.run before sending config is finished
        display_w: "480"
        display_h: "480"
        grid_cols: "12" # increase for more resolution of object
        grid_rows: "12" # increase for more resolution of object
        grid_gutter: "8" # This looked nice for me
        grid_margin: "4" # This looked nice for me
        bg_color: "#000000"  #Black
        primary_color: "#4193d5" #Moderate Blue
        secondary_color: "#ee9f52"  #Soft orange
        accent_color: "#A175C4" #Slightly desaturated violet
        success_color: "#6cbe58" #Moderate lime green
        warning_color: "#d67430" #Strong orange
        error_color: "#e25628" #Bright red
        radius: "4"
You should now have a working display which is integrated in Home Assistant and communicates via MQTT as well as a New Template Sensor with the given attributes
Configuration
FTP
Login name: sssss
Password: nnnnnn
My experiments using the FTP program FileZilla were not impressive. File transfers mostly timed out.
Reloading the configuration
After you make changes to the configuration of the plate you can apply them by either
- Restarting Home Assistant
- By reloading the integration from Lovelace user interface with option found in
- Configuration > Devices & Services > openHASP > (your plate >) 3dots menu > Reload.
- Note that this has to be done individually for each configured plate.
You can achieve the same with a service call:
service: homeassistant.reload_config_entry
data:
  entry_id: 903d2d976d6f2654092c513138d2b365
target:
  entity_id: openhasp.plate
The entry_id is found in the .storage/core.config_entries file from your main Home Assistant configuration directory (do NOT edit this file!).
Page Design
File Editor (OpenHASP Documentation)
pages.jasonl
Pages documents
Each page is defined in pages.jasonl. This is where the object location, type and properties are defined.
Examples:
Collapsed. Click on "Expand" to view.
{"page":1,"id":1,"obj":"btn","x":0,"y":0,"w":240,"h":40,"text":"openHASP","value_font":22,"bg_color":"#2C3E50","text_color":"#FFFFFF","radius":0,"border_side":0}
This defines Page 1, Object 1, the object is a button located at (x,y) 0,0, 240 pixels wide and 40 pixels high.
The text is "openHasp" using the value_font, 22 point.
The background color is dark blue, text color is white.
"radius":0 means the object has square corners. 100 makes a pill-shaped object.
{"page":1,"id":2,"obj":"btn","x":10,"y":50,"w":105,"h":90,"toggle":true,"text":"\uE335","text_font":32,"mode":"break","align":1}
This defines Page 1, Object 2, the object is a button located at (x,y) 10,50, 105 pixels wide and 90 pixels high.
"Toggle":true means that the button is a toggle. It maintains its state between presses.
"text":"\uE335" displays a light icon. (See the link above)
"text_font":32 sets the font and text size. Valid sizes are: 8(default), 16, 24, 32 and 48pt (and the 8pt default font).
"mode":"break" acts like a line break. This means that the next object will be placed at the beginning of the next line.
"align":1 sets the alignment of the text within this label. (0,1,or 2 = Left, Center, or Right)
{"page":1,"id":3,"obj":"dropdown","x":10,"y":150,"w":200,"h":60,"options":"Apples\nBananas\nOranges\nMelon"}
This defines Page 1, Object 3, the object is a dropdown located at (x,y) 10,150, 200 pixels wide and 60 pixels high.
"options" lists the items in the dropdown.
{"page":0,"id":1,"obj":"label","x":175,"y":60,"h":50,"w":120,"text":"XX.X°C","align":2,"bg_color":"#2C3E50","text_color":"#FFFFFF"}
This defines Page 0, Object 1. Page 0 refers to an object visible on all pages.
The object is a label located at (x,y) 175,60, 120 pixels wide and 50 pixels high.
The initial text of the label is "XX.X°C". The object color is white text on dark blue.
objects- Every object can be set pixel perfect. This means you have to define every Width/Height x-and y-position.
Fonts and Icons
In OpenHASP, you can use any TrueType font containing characters or icons. Here are the steps to upload and use icons:
1. Upload the Icon Font: Upload any TTF (TrueType) font file containing the icons to the flash partition of your plate. If you want to use other styles than Regular like Italic or Bold, make sure you use a font which provides separate, optimized versions for these.
2. Use the Icon in Text: To use an icon in a text, you need to prefix the UTF-8 character code with `u`. To ensure proper decoding the payload should be used with a `json` or `jsonl` command.
3. Upload FontAwesome Icons: If you want to use FontAwesome icons, upload another .zi file named `fontawesome xx .zi` of the same point size as the normal text .zi font. For example, if your custom font is `arial24.zi`, you should also add a `fontawesome24.zi` file. You can download `fontawesome.zip` from the HMI Font Pack repository.
In pages.jasonl, there is a button configured:
====Foreground and Background colors====
[https://openhasp.haswitchplate.com/0.7.0/design/styling/#built-in Styling Properties]: Adjust the appearance of objects by changing the foreground, background and/or border color of each object.
Data Types
- Some objects allow for more complex styling, effectively changing the appearance of their sub-components.
Data Types: There are 5 major data types that openHASP uses when communicating over MQTT.
Examples
Page Navigation
Widget Examples
Lovelace Entities
Dash UI
Animated icons
Handle offline entities
Forum Notes
Push Image, Image background
Tips
Colors
ColorHexa.com is a free color tool providing information about any color and generating matching color palettes
Code2Color- inline Color Preview for Code. Input any code or text and see your HEX, RGB, ... colors appear.
Color Palette
Note: color names in "quotes" are not recignized by openHasp. Use the hex value instead.
| Color | #hex | HMI | Color name |
|---|---|---|---|
| #ffffff | 65535 | White | |
| #f8f9fa | 65503 | Snow Drift | |
| #eaecf0 | 61309 | ||
| #c8ccd1 | 52858 | Ghost | |
| #a2a9b1 | 42326 | Grey Chateau | |
| #72777d | 29615 | Pale Sky | |
| #54595d | 21195 | Davey Grey | |
| #222222 | 8452 | mini black | |
| #000000 | 0000 | Black | |
| #eaf3ff | 61343 | Water | |
| #3366cc | 13113 | warm-blue | |
| #0000ff | 31 | strong blue | |
| #2a4b8d | 10833 | chambray | |
| #fee7e6 | 65340 | dawn pink | |
| #dd3333 | 55686 | persian red | |
| #ff0000 | 63488 | red | |
| #b32425 | 45316 | roof terracotta | |
| #fef6e7 | 65468 | old lace | |
| #ffcc33 | 65126 | mikado yellow | |
| #ffff00 | 65504 | yellow | |
| #acac00 | 44384 | mustard green | |
| #d5fdf4 | 55294 | foam | |
| #00af89 | 1393 | mint | |
| #00ff00 | 2016 | green | |
| #14866d | 5165 | viridian | |
| #2c3e50 | "Pickled Bluewood" |
GPIO
On my switch, the power relay (L1) is on GPIO40:
Other models have a relay on GPIO02 (L2) and GPIO01 (L3).
In settings -> GPIO, assign the GPIO pin to a group number:
Here is a pages.jsonl line that defines a switch connected to "groupid":1.
{"page":2,"id":5,"obj":"switch","x":30,"y":150,"w":180,"h":75,"radius":40,"radius20":40,"groupid":1,"comment":"Relay"}
Note that both reference "Group 1". This means that the switch on the display can control the GPIO pin directly.
img
- Examples.
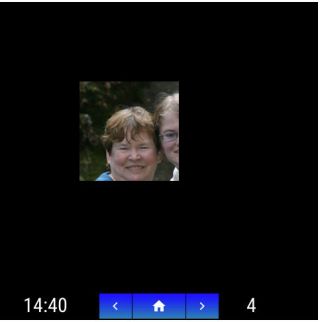
This example displays a 240x240 pixels image in the center of a 480x480 screen:
{"page":4,"id":1,"obj":"img","src":"L:/steph-kim-240x240.png","auto_size":1,"x":120,"y":120}
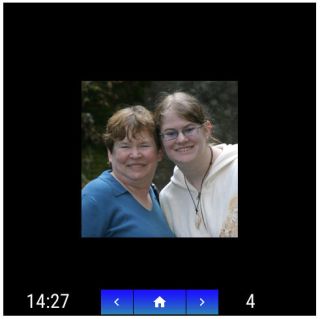
In this example, auto_size is set to 1 (true). The size of the image object will automatically match the size of the source image.
The w and h parameters (width and height) will be ignored.
If auto_size is set to 0 (false), the image will not automatically resize to match the source image and the w and h parameters set the image size.
In this example, the h and w parameters are set to 150. Notice that the image itself is not resized- only the displayed window.:
"page":4,"id":1,"obj":"img","src":"L:/steph-kim-240x240.png","auto_size":0,"h":150,"w":150,"x":120,"y":120}
This does let you crop the image a bit. Consider when I change "x":200

Text
"alignment":0
The align property sets the alignment of the text within an object. (Label, button, etc).
- 0: Left alignment
- 1: Right alignment
- 2: Center alignment
"bg_color":"#2C3E50"
This property sets the color of the background of the object.
You may use any hex number for the color, or most of the named colors.
Here is a sample palette.
"bg_opa":0
bg_opa refers to the background opacity of an object. This property allows you to adjust the transparency of the background of an object. A higher value means the background is more opaque, while a lower value makes it more transparent. This can be useful for creating layered visual effects or for making certain elements stand out more than others
"toggle":
The "toggle" property in openHASP controls whether a button acts as a toggle switch or a normal button.
When "toggle" is set to true "toggle":true), the button acts as a toggle switch. The button sends out the old value in the down event and the new value in the up event when released1. For example, when toggling on, it sends {"event":"down","val":0} followed by {"event":"up","val":1}1. When toggling off, it sends {"event":"down","val":1} followed by {"event":"up","val":0}1.
If "toggle" is set to false, the button acts as a normal button. Normal buttons send touch events while they occur. For example, a short touch sends {"event":"down"} followed by {"event":"up"}. A long press sends a sequence of events: {"event":"down"}, {"event":"long"}, multiple {"event":"hold"}, and finally {"event":"release"}.
data{}
These are functionally identical"
#{"page":2,"id":1,"obj":"dropdown","x":10,"y":150,"w":200,"h":60,"options":"Office\nDesklight\nWorklight"}
    - obj: "p2b1" # dropdown
      event:
        "changed":
          - service: homeassistant.toggle
            data:
              entity_id: >
                {% if text == "Office" %}
                  switch.officelight
                {% elif text == "Desklight" %}
                  switch.steve_desklight_relay_2
                {% elif text == "Worklight" %}
                  switch.kim_worklight_relay
                {% endif %}


#{"page":2,"id":1,"obj":"dropdown","x":10,"y":150,"w":200,"h":60,"options":"Office\nDesklight\nWorklight"}
    - obj: "p2b1" # dropdown
      event:
        "changed":
          - service: homeassistant.toggle
            data: {}
            target:
              entity_id: >
                {% if text == "Office" %}
                  switch.officelight
                {% elif text == "Desklight" %}
                  switch.steve_desklight_relay_2
                {% elif text == "Worklight" %}
                  switch.kim_worklight_relay
                {% endif %}
openhasp.yaml
This yaml file is called from configuration.yaml and it determines the actions of the objects defined in pages.jasonl.
- Example
plate:
  objects:
    - obj: "p1b4"
      properties:
        "text": 'Attic: {{ states("sensor.attic_sensors_temperature") }}°F'
    - obj: "p1b2"  # light-switch toggle button
      properties:
        "val": '{{ 1 if states("switch.officelight") == "on" else 0 }}'
        "text": '{{ "\uE6E8" if is_state("switch.officelight", "on") else "\uE335" | e }}'
      event:
        "up":
          - service: homeassistant.toggle
            entity_id: "switch.officelight"
- Decoded
 - obj: "p1b4"
      properties:
        "text": 'Attic: {{ states("sensor.attic_sensors_temperature") }}°F'
The label object at p1b4 is defined in pages.jsonl:
{"page":1,"id":4,"obj":"label","x":175,"y":60,"h":50,"w":200,"text":"XX.X°C","align":0,"bg_color":"#2C3E50","text_color":"#FFFFFF"}
This assigns the entity value into the label.
 - obj: "p1b2"  # light-switch toggle button
      properties:
        "val": '{{ 1 if states("switch.officelight") == "on" else 0 }}'
        "text": '{{ "\uE6E8" if is_state("switch.officelight", "on") else "\uE335" | e }}'
      event:
        "up":
          - service: homeassistant.toggle
            entity_id: "switch.officelight"
The button object at p1b2 is defined in pages,jsonl:
{"page":1,"id":2,"obj":"btn","x":10,"y":50,"w":105,"h":90,"toggle":true,"text":"\uE335","text_font":48,"mode":"break","align":1}
"val" is either 1 or 0 depending on the state of the entity.
"text" is one of two icons depending on the state of the entity.
event: is what the panel publishes over MQTT: "hasp/plate/state/p1b2"
- In this example, if the event is "up", then a service is called to toggle the light.
Tips
Alexa without Nabu Casa
1. Install Node Red Add-on to Home Assistant.
2. Add the node-red-contrib-alexa-cakebaked node to the pallete.
3. Here’s the magic. Create an account on Ben Hardill’s website. Ben maintains the magic link between Alexa and Node Red. He does all of the AWS work for you. Adding devices could not be easier. I have 40 devices on his server now, and adding a new device takes about two minutes. If I am slow. Ben offers this service to the community for free, but I strongly recommend that you to commit a $1/month sponsorship through Github.
In this example, I will add a Sonoff Mini R4 that I just flashed with ESPHome. Alexa will know it as “Fred”, and Home Assistane already knows the ESPHome device as “sonoffminir4”.
Open the Hardill site and click on devices.
Click on Add Device. As in the image below, I named the device “Fred”, and made it a simple on-off

After adding the device to your Hardill account, tell Alexa to “Discover”. About a minute later, Alexa announces that she had found a new device: “Fred”.
In Home Assistant/Node-Red, drop the Alexa-home node on your flow. The first time you open it you will need to configure the node with your Alexa login credentials.
You should find Fred in the device dropdown. It isn’t alphabetic, but the most recent device added is usually at the bottom of the list. Select Fred then click on “Done”.
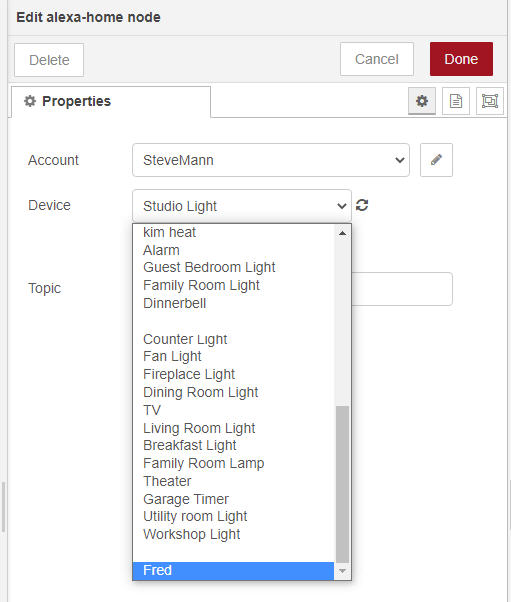
I added a debug node to show that Alexa is responding to “Fred”. Deploy, then select the Debug panel:
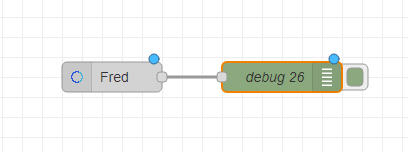
Now, when I say “Alexa, turn on Fred”, the Alexa Home node outputs a command, “TurnOnRequest” for on and “TurnOffRequest” for off.
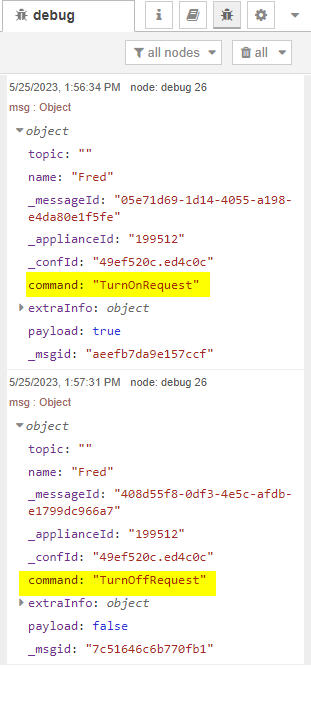
From here you can do just about anything you want with the Node Red flow. But, I just want to turn the Sonoff switch on or off, so I added a switch node to determine if the command was “TurnOnRequest” or “TurnOffRequest”. Then a Change Node to change the payload to “on” or “off”, then finally into a “Call Service” node to tell Home Assistant to turn Fred on or off.

the flow code
[{"id":"a0859613214d75bc","type":"alexa-home","z":"5d1b0398.99236c","conf":"49ef520c.ed4c0c","device":"199512","acknoledge":true,"name":"Fred","topic":"","x":190,"y":2860,"wires":"d3e7050d43452a6f"},{"id":"d3e7050d43452a6f","type":"switch","z":"5d1b0398.99236c","name":"on or off","property":"command","propertyType":"msg","rules":[{"t":"eq","v":"TurnOnRequest","vt":"str"},{"t":"eq","v":"TurnOffRequest","vt":"str"}],"checkall":"true","repair":false,"outputs":2,"x":360,"y":2860,"wires":[["b295e70dfb6e5e97"],["4da578b998f05402"]]},{"id":"b295e70dfb6e5e97","type":"change","z":"5d1b0398.99236c","name":"Set payload to on","rules":[{"t":"set","p":"payload","pt":"msg","to":"on","tot":"str"}],"action":"","property":"","from":"","to":"","reg":false,"x":570,"y":2840,"wires":"4e46a720527e90e6"},{"id":"4da578b998f05402","type":"change","z":"5d1b0398.99236c","name":"Set payload to off","rules":[{"t":"set","p":"payload","pt":"msg","to":"off","tot":"str"}],"action":"","property":"","from":"","to":"","reg":false,"x":570,"y":2880,"wires":"233cec751d2910a7"},{"id":"4e46a720527e90e6","type":"api-call-service","z":"5d1b0398.99236c","name":"Turn Fred On","server":"cc0d1734.6963a8","version":5,"debugenabled":true,"domain":"switch","service":"turn_on","areaId":[],"deviceId":[],"entityId":["switch.sonoffminir4_sonoffminir4"],"data":"","dataType":"json","mergeContext":"","mustacheAltTags":false,"outputProperties":[],"queue":"none","x":800,"y":2840,"wires":[[]]},{"id":"233cec751d2910a7","type":"api-call-service","z":"5d1b0398.99236c","name":"Turn Fred Off","server":"cc0d1734.6963a8","version":5,"debugenabled":true,"domain":"switch","service":"turn_off","areaId":[],"deviceId":[],"entityId":["switch.sonoffminir4_sonoffminir4"],"data":"","dataType":"json","mergeContext":"","mustacheAltTags":false,"outputProperties":[],"queue":"none","x":790,"y":2880,"wires":[[]]},{"id":"49ef520c.ed4c0c","type":"alexa-home-conf","username":"SteveMann","info":"https://alexa-node-red.bm.hardill.me.uk/"},{"id":"cc0d1734.6963a8","type":"server","name":"Home Assistant- Raspberry","version":5,"addon":true,"rejectUnauthorizedCerts":true,"ha_boolean":"y|yes|true|on|home|open","connectionDelay":true,"cacheJson":true,"heartbeat":false,"heartbeatInterval":30,"areaSelector":"friendlyName","deviceSelector":"friendlyName","entitySelector":"friendlyName","statusSeparator":"at: ","statusYear":"hidden","statusMonth":"short","statusDay":"numeric","statusHourCycle":"h23","statusTimeFormat":"h:m","enableGlobalContextStore":true}]
Assign an area to an entity
You can change the device area in the Advanced Settings here.
Bluetooth
Dashboard Tips
Dwains Dashboard
YouTube tutorial- Automatically Create Home Assistant Dashboards! NO YAML!
Delete an Automation
Delete an MQTT device
1. In "Devices", click on the device to delete
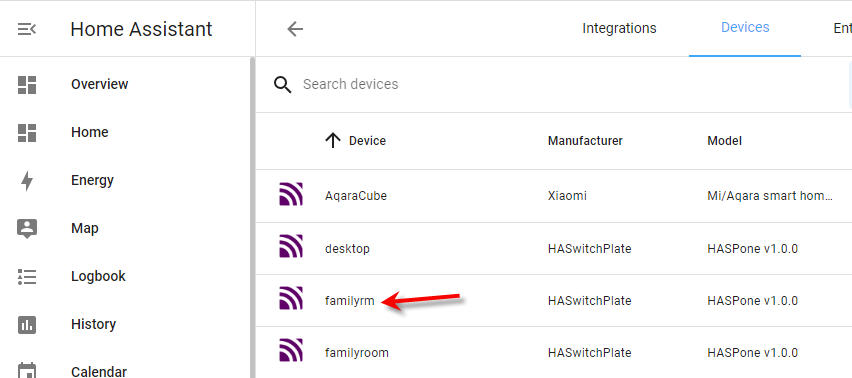
2. Click on the kebab menu to delete the device.
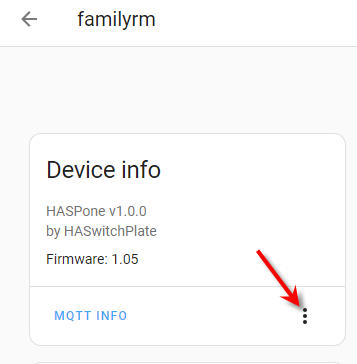
If the device pops up again with the old data, then it might be that its still in MQTT with a RETAIN tag.
To delete from MQTT the easiest way is to use MQTT-Explorer. connect it to your MQTT instance and just delete the old tasmota switch.
Delete the database file
The database file can get pretty big, so I delete it every few months.
-rw-r--r--    1 root     root      866.4M Dec 22 11:35 home-assistant_v2.db
-rw-r--r--    1 root     root       32.0K Dec 22 11:35 home-assistant_v2.db-shm
-rw-r--r--    1 root     root        5.0M Dec 22 11:36 home-assistant_v2.db-wal
What are the db-shm and db-wal files?
From petro:
they are temp files for sqlite (the database), delete them too.
Device Location
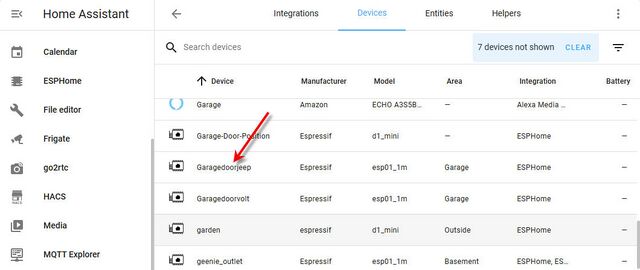
Here's how you change a device location:
In Devices, click on the device that you want to add or change the location.
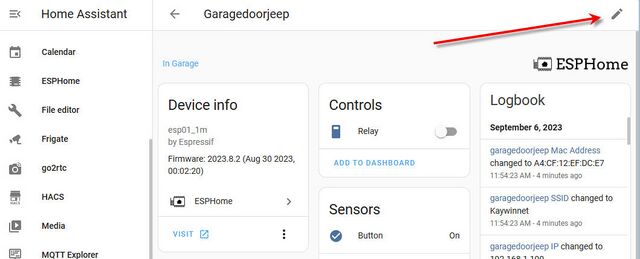
- Next, click on the edit icon
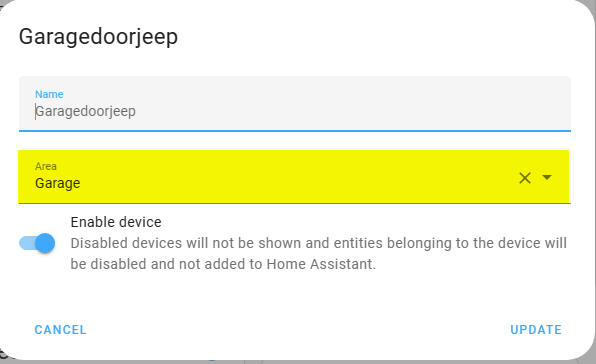
- Here you can edit the area
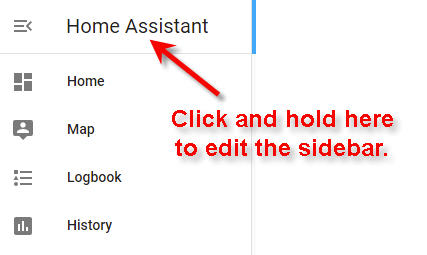
Edit the Sidebar
Allows sidebar items to be hidden and moved.
Long press on the sidebar will start edit mode, you can move items by dragging them to the right place.
Hiding is done by pressing the X button.
Hidden panels are shown underneath the shown panels, clicking them will restore them.
All data is stored in localStorage, meaning this is a user/browser setting, and it doesn't survive a logout.
Graphs
Queston from forum
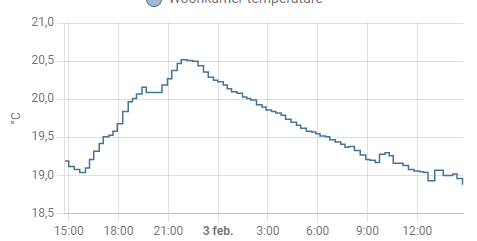
How do you get those nice graphs? I’m stuck with the blocky standard graphs
Answer by: tom_l
Give your sensors a device_class and a state_class of measurement. Then the graphs show 5 minute means with min and max shading.
If Then Else
Here is an example of IF THEN in an automation.
Icons
MDI
Hue
Make a switch appear in the light domain.
- platform: gpio
  id: sonoff_relay
  pin:
    number: GPIO12

light:
- platform: binary
  name: "${friendly_name}"
  id: light_relay
  output: sonoff_relay
  restore_mode: ALWAYS_OFF
Network Storage
Logon-Logoff sounds
From the Ubuntu user forums:
The Yaru sound theme has a login and logoff sound! You can enable the login sound by adding
mpv /usr/share/sounds/Yaru/stereo/desktop-login.oga
in Startup Applications, but I can't enable the logoff sound. Can somebody please help me enable the Yaru logoff sound?
I added my script in /usr/lib/systemd/system-shutdown and it works!
notifications
I wanted an easy way to test an automation while being developed, and the persistent notifications would put any notification I wanted into my notificatiopns panel.
You can add one by calling
persistent_notification.create
or if you don’t care what the ID of it is (generally you don’t unless you plan to use persistent_notification.dismiss to clear it via an automation).
notify.persistent_notification
Also
notify.alexa_media_stephen
does a text to speech to my Alexa unit on the desktop.
OpenMQTTGateway
OpenMQTTGateway project goal is to concentrate in one firmware different technologies and protocols, decreasing by the way the number of physical bridges needed, and hiding the different technologies singularity behind a simple & wide spread communication protocol; MQTT
Passwords and Configurations
Passwords and configurations can be found in
/config/.storage/core.config_entries
(A text file). It’s supposed to be off limits, but some integrations were migrated to UI without proper thinking, and do not allow basic capabilities such as changing user/password or API keys.
The “proper” way is to remove and reinstall the integration, but hey, are we tinkerers or are we not?
Detect if a node is alive
# This sensor lets me see if a node is connected or not. (Disconnected means in Deep Sleep, for example).
# Ping host 192.168.1.201 (This requires a fixed IP. solar.local did not respond)
binary_sensor:
  - platform: ping
    host: 192.168.1.201
    name: "Sollar Temperature Probe"
    count: 2
    scan_interval: 5<

  - platform: ping
    name: Internet
    host: 8.8.8.8
    scan_interval: 15
Reboot the host
From Home Assistant
Three dot menu in the top right corner of Settings > System > Hardware
From the Terminal CLI
Click on the Terminal icon (or open the Terminal and SSH add-on then open the Web UI).
This enters a CLI, and you are root.
You can enter ha help to see what commands are available.
ha host help shows what host related commands are available.
ha host reboot will reboot the host. Warning, the restart of Home Assistant takes three or four minutes.

