Home Assistant: Difference between revisions
(→Tips) |
|||
| Line 201: | Line 201: | ||
{{template:toponly}} | {{template:toponly}} | ||
==Network Storage== | |||
[https://www.home-assistant.io/common-tasks/os/#network-storage Docs: Network Storage]<br> | |||
{{template:toponly}} | |||
==Logon-Logoff sounds== | |||
From the Ubuntu user forums:<br> | |||
The Yaru sound theme has a login and logoff sound! You can enable the login sound by adding | |||
mpv /usr/share/sounds/Yaru/stereo/desktop-login.oga | |||
in Startup Applications, but I can't enable the logoff sound. Can somebody please help me enable the Yaru logoff sound? | |||
I added my script in /usr/lib/systemd/system-shutdown and it works!<br> | |||
{{template:top}} | |||
Revision as of 11:26, 6 September 2023
Tips
Alexa without Nabu Casa
1. Install Node Red Add-on to Home Assistant.
2. Add the node-red-contrib-alexa-cakebaked node to the pallete.
3. Here’s the magic. Create an account on Ben Hardill’s website. Ben maintains the magic link between Alexa and Node Red. He does all of the AWS work for you. Adding devices could not be easier. I have 40 devices on his server now, and adding a new device takes about two minutes. If I am slow. Ben offers this service to the community for free, but I strongly recommend that you to commit a $1/month sponsorship through Github.
In this example, I will add a Sonoff Mini R4 that I just flashed with ESPHome. Alexa will know it as “Fred”, and Home Assistane already knows the ESPHome device as “sonoffminir4”.
Open the Hardill site and click on devices.
Click on Add Device. As in the image below, I named the device “Fred”, and made it a simple on-off

After adding the device to your Hardill account, tell Alexa to “Discover”. About a minute later, Alexa announces that she had found a new device: “Fred”.
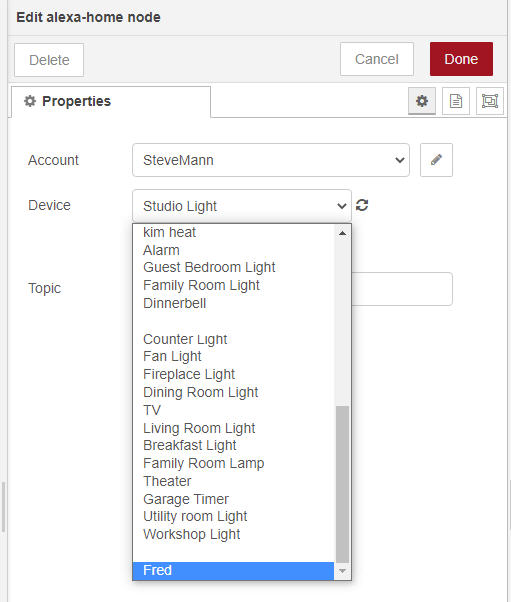
In Home Assistant/Node-Red, drop the Alexa-home node on your flow. The first time you open it you will need to configure the node with your Alexa login credentials.
You should find Fred in the device dropdown. It isn’t alphabetic, but the most recent device added is usually at the bottom of the list. Select Fred then click on “Done”.
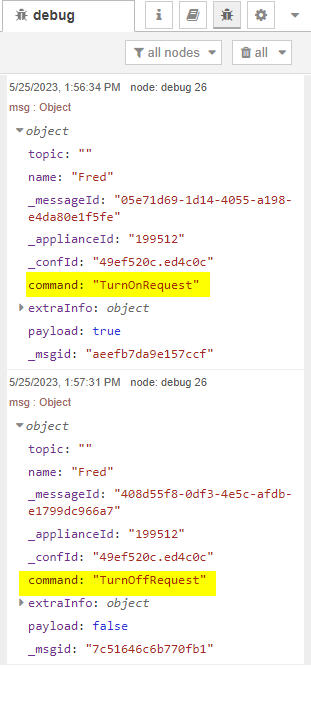
I added a debug node to show that Alexa is responding to “Fred”. Deploy, then select the Debug panel:
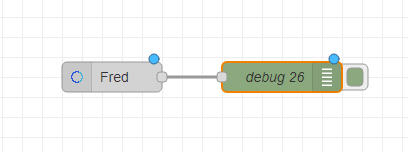
Now, when I say “Alexa, turn on Fred”, the Alexa Home node outputs a command, “TurnOnRequest” for on and “TurnOffRequest” for off.
From here you can do just about anything you want with the Node Red flow. But, I just want to turn the Sonoff switch on or off, so I added a switch node to determine if the command was “TurnOnRequest” or “TurnOffRequest”. Then a Change Node to change the payload to “on” or “off”, then finally into a “Call Service” node to tell Home Assistant to turn Fred on or off.

the flow code
[{"id":"a0859613214d75bc","type":"alexa-home","z":"5d1b0398.99236c","conf":"49ef520c.ed4c0c","device":"199512","acknoledge":true,"name":"Fred","topic":"","x":190,"y":2860,"wires":"d3e7050d43452a6f"},{"id":"d3e7050d43452a6f","type":"switch","z":"5d1b0398.99236c","name":"on or off","property":"command","propertyType":"msg","rules":[{"t":"eq","v":"TurnOnRequest","vt":"str"},{"t":"eq","v":"TurnOffRequest","vt":"str"}],"checkall":"true","repair":false,"outputs":2,"x":360,"y":2860,"wires":[["b295e70dfb6e5e97"],["4da578b998f05402"]]},{"id":"b295e70dfb6e5e97","type":"change","z":"5d1b0398.99236c","name":"Set payload to on","rules":[{"t":"set","p":"payload","pt":"msg","to":"on","tot":"str"}],"action":"","property":"","from":"","to":"","reg":false,"x":570,"y":2840,"wires":"4e46a720527e90e6"},{"id":"4da578b998f05402","type":"change","z":"5d1b0398.99236c","name":"Set payload to off","rules":[{"t":"set","p":"payload","pt":"msg","to":"off","tot":"str"}],"action":"","property":"","from":"","to":"","reg":false,"x":570,"y":2880,"wires":"233cec751d2910a7"},{"id":"4e46a720527e90e6","type":"api-call-service","z":"5d1b0398.99236c","name":"Turn Fred On","server":"cc0d1734.6963a8","version":5,"debugenabled":true,"domain":"switch","service":"turn_on","areaId":[],"deviceId":[],"entityId":["switch.sonoffminir4_sonoffminir4"],"data":"","dataType":"json","mergeContext":"","mustacheAltTags":false,"outputProperties":[],"queue":"none","x":800,"y":2840,"wires":[[]]},{"id":"233cec751d2910a7","type":"api-call-service","z":"5d1b0398.99236c","name":"Turn Fred Off","server":"cc0d1734.6963a8","version":5,"debugenabled":true,"domain":"switch","service":"turn_off","areaId":[],"deviceId":[],"entityId":["switch.sonoffminir4_sonoffminir4"],"data":"","dataType":"json","mergeContext":"","mustacheAltTags":false,"outputProperties":[],"queue":"none","x":790,"y":2880,"wires":[[]]},{"id":"49ef520c.ed4c0c","type":"alexa-home-conf","username":"SteveMann","info":"https://alexa-node-red.bm.hardill.me.uk/"},{"id":"cc0d1734.6963a8","type":"server","name":"Home Assistant- Raspberry","version":5,"addon":true,"rejectUnauthorizedCerts":true,"ha_boolean":"y|yes|true|on|home|open","connectionDelay":true,"cacheJson":true,"heartbeat":false,"heartbeatInterval":30,"areaSelector":"friendlyName","deviceSelector":"friendlyName","entitySelector":"friendlyName","statusSeparator":"at: ","statusYear":"hidden","statusMonth":"short","statusDay":"numeric","statusHourCycle":"h23","statusTimeFormat":"h:m","enableGlobalContextStore":true}]
Assign an area to an entity
You can change the device area in the Advanced Settings here.
Bluetooth
Configure the ESP32 to work as a Bluetooth device
- How do I configure the esp32 to work as a bluetooth device? I have it setup in esphome and it sees it, but where do I go after that?
From nickrout:
Flash it with esphome with this in the config
bluetooth_proxy:
  active: true
Proxy
Tutorial Part 1- EASY Bluetooth Proxies in Home Assistant! Increase the range of your passive Bluetooth devices!
Tutorial Part 2- Use this CHEAP Xiaomi thermometer with an ESP32 and Home Assistant.
Sniffing BTLE
Add a line into configuration.yaml to get access to the Logger Service:
# Get access to logger.set_level service following bdraco live demo
# https://youtu.be/m9gKFH8WlzY?t=3297
  logger:
  default: warn
Restart Home Assistant
Set Bluetooth logging to debug Developer Tools → Services
service: logger.set_level
data:
  homeassistant.components.bluetooth: debug
call service
Terminal:
 cd /config
 tail -f home-assistant/.log | grep "bluetooth" > bt_log.txt
Watch for devices in the log, noting addresses and data
Set the logging back to warn to not fill up the uSD
service: logger.set_level
data:
  homeassistant.components.bluetooth: warn
call service
Dashboard Tips
Dwains Dashboard
YouTube tutorial- Automatically Create Home Assistant Dashboards! NO YAML!
Delete an Automation
Delete an MQTT device
1. In "Devices", click on the device to delete
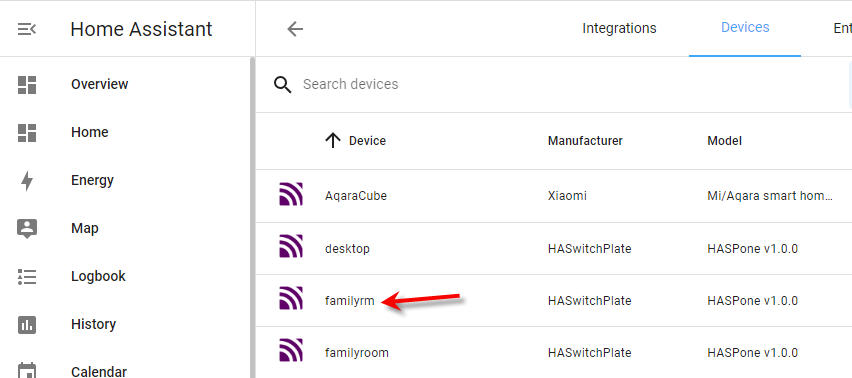
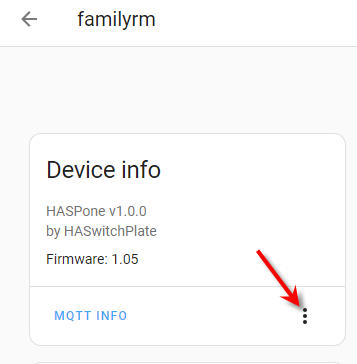
2. Click on the kebab menu to delete the device.
If the device pops up again with the old data, then it might be that its still in MQTT with a RETAIN tag.
To delete from MQTT the easiest way is to use MQTT-Explorer. connect it to your MQTT instance and just delete the old tasmota switch.
Delete the database file
The database file can get pretty big, so I delete it every few months.
-rw-r--r--    1 root     root      866.4M Dec 22 11:35 home-assistant_v2.db
-rw-r--r--    1 root     root       32.0K Dec 22 11:35 home-assistant_v2.db-shm
-rw-r--r--    1 root     root        5.0M Dec 22 11:36 home-assistant_v2.db-wal
What are the db-shm and db-wal files?
From petro:
they are temp files for sqlite (the database), delete them too.
Device Location
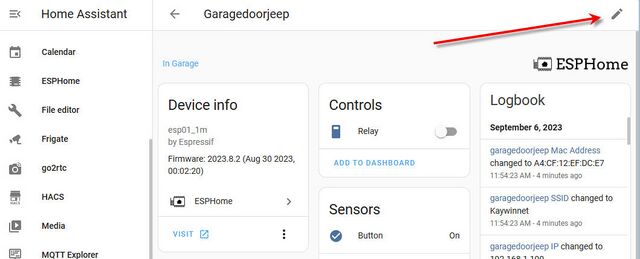
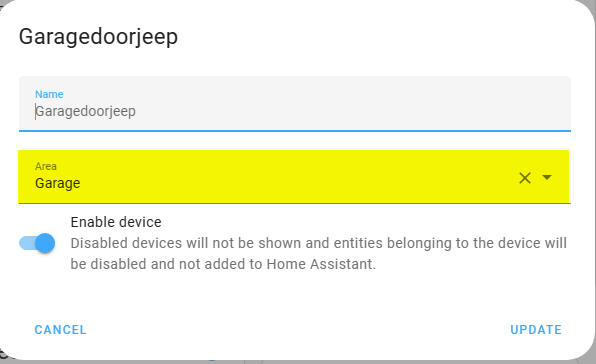
Here's how you change a device location:
In Devices, click on the device that you want to add or change the location.
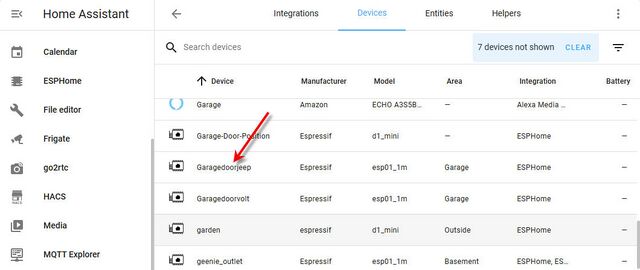
- Next, click on the edit icon
- Here you can edit the area
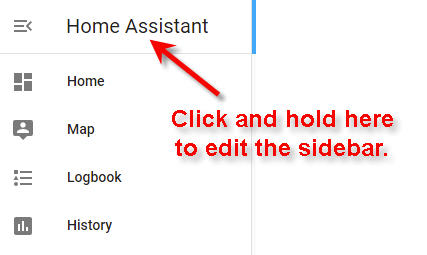
Edit the Sidebar
Allows sidebar items to be hidden and moved.
Long press on the sidebar will start edit mode, you can move items by dragging them to the right place.
Hiding is done by pressing the X button.
Hidden panels are shown underneath the shown panels, clicking them will restore them.
All data is stored in localStorage, meaning this is a user/browser setting, and it doesn't survive a logout.
Graphs
Queston from forum
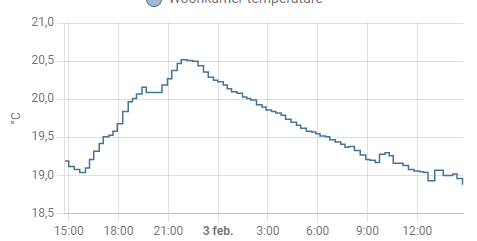
How do you get those nice graphs? I’m stuck with the blocky standard graphs
Answer by: tom_l
Give your sensors a device_class and a state_class of measurement. Then the graphs show 5 minute means with min and max shading.
If Then Else
Here is an example of IF THEN in an automation.
Icons
MDI
Hue
Make a switch appear in the light domain.
- platform: gpio
  id: sonoff_relay
  pin:
    number: GPIO12

light:
- platform: binary
  name: "${friendly_name}"
  id: light_relay
  output: sonoff_relay
  restore_mode: ALWAYS_OFF
Network Storage
Logon-Logoff sounds
From the Ubuntu user forums:
The Yaru sound theme has a login and logoff sound! You can enable the login sound by adding
mpv /usr/share/sounds/Yaru/stereo/desktop-login.oga
in Startup Applications, but I can't enable the logoff sound. Can somebody please help me enable the Yaru logoff sound?
I added my script in /usr/lib/systemd/system-shutdown and it works!
